cantonese recipe
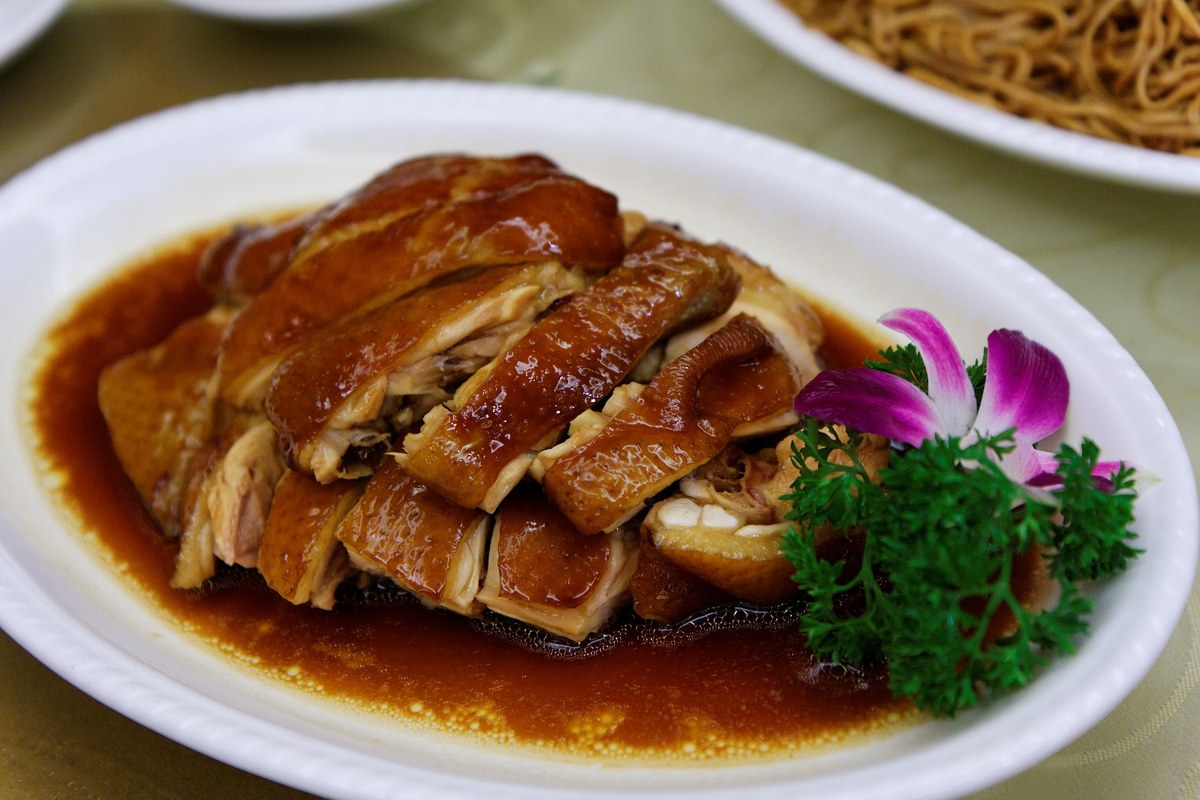
Soy Sauce Chicken with Glossy Cantonese-Style Skin
Build a soy sauce braising liquid with ginger, scallion, sugar, and aromatics, lower the chicken into a gentle simmer, baste or turn it often, then rest before cutting so the skin stays glossy and the juices settle.
Overview
Why this recipe works
Soy Sauce Chicken is a 60-minute Cantonese recipe built around braise and simmer. Soy sauce chicken is a Cantonese poached-braised chicken, not baked chicken brushed with soy sauce. The skin gets its shine from a seasoned soy bath, repeated basting, and gentle heat that cooks the meat without tearing the surface.
The useful move is to treat the recipe as a sequence of cues instead of a race through the clock. Start by watching for soy liquid trembles instead of boiling hard; later, check that skin turns evenly mahogany and glossy. That keeps the dish controlled on a home stove even when your pan, burner, or ingredient sizes differ.
This version is especially useful for family dinner and make ahead. The ingredient focus is chicken, poultry, ginger, and scallion, with Light Soy Sauce, Oyster Sauce, and Chinkiang Vinegar doing most of the seasoning work.
Before cooking, read the method once and decide where your attention is needed. In Soy Sauce Chicken, the important path is braise and simmer, so the cook should prepare the ingredients, keep the pan setup simple, and avoid hunting for seasonings after heat has started.
The time estimate is useful, but it is not the final authority. If soy liquid trembles instead of boiling hard takes longer than expected, stay with that cue before moving forward. If skin turns evenly mahogany and glossy happens quickly, lower the heat or move to the next step instead of waiting for an exact minute count.
The recipe is written for family dinner and make ahead, which means the best version is not always the most elaborate version. Keep the pantry anchor clear, use Light Soy Sauce, Oyster Sauce, and Chinkiang Vinegar with restraint, and let the final texture tell you whether the dish needs more heat, more liquid, or a shorter finish.
Use the related pantry and technique links when you want to change the recipe. Those pages explain the role of chicken, poultry, ginger, and scallion and Chinese Red Braise, so substitutions stay connected to flavor, texture, and safety instead of becoming random swaps.
If you are cooking from a small kitchen, keep the workspace calm. Put cut ingredients in order, clear a landing spot for the finished dish, and read the safety note before handling leftovers. That preparation makes the recipe easier to follow and gives the page enough context to help readers who are still deciding whether this dish fits their night.
Best for
Family dinner and make ahead cooks who want a clear Cantonese dish without guessing at doneness.
Main cue
Soy liquid trembles instead of boiling hard
Pantry anchor
Light Soy Sauce, Oyster Sauce, and Chinkiang Vinegar
Cook's notes
What changes the result
The opening should separate Cantonese soy sauce chicken from generic soy-glazed baked chicken by explaining that the dish depends on a fragrant soy bath, gentle poaching, repeated basting, and resting before chopping.
Judgement call
If the soy bath is boiling hard enough to slap the skin, lower the heat. Glossy skin comes from time and basting, not agitation.
Common failure points
- The skin tears because the liquid boils hard or the bird is grabbed roughly.
- The chicken tastes salty because the sauce reduced too far before the meat finished.
- The color is patchy because exposed skin was not basted or turned.
- The meat loses juice because it was chopped immediately after cooking.
Flavor adjustment
- For a deeper barbecue-shop color, use both light and dark soy sauce.
- For a lighter home dinner, use bone-in legs and dilute the soy bath slightly.
- For sweeter Hong Kong-style balance, use rock sugar but avoid making the sauce syrupy.
- For extra aroma, add star anise, cinnamon, or dried tangerine peel in small amounts.
Regional context
Soy sauce chicken, also called see yao gai or si yau kai in Cantonese contexts, is associated with Cantonese cooking and barbecue-shop counters where glossy soy-poached chicken is chopped to order.
Ingredients
What goes in
Read the ingredient list once before heating the pan. Measure the pantry items first, group the fresh ingredients by when they enter the recipe, and keep the thickener or finishing seasoning close to the stove so the final step does not stall.
- 1 whole small chicken, about 3 to 4 lb, or 4 bone-in chicken legs
- 1/2 cup light soy sauce
- 1/4 cup dark soy sauce
- 1/4 cup Shaoxing wine
- 2 tbsp rock sugar or brown sugar
- 4 slices ginger
- 3 scallions, folded or cut into lengths
- 2 star anise pods
- 1 small cinnamon stick, optional
- 3 cups water or enough to partially cover the chicken
- Sesame oil for brushing, optional
Watch for
- soy liquid trembles instead of boiling hard
- skin turns evenly mahogany and glossy
- sugar dissolves before chicken enters
- thickest meat is cooked through
- chicken rests before chopping so juices do not flood the board
Ingredient notes
Know the pantry before you cook
The pantry backbone for this recipe is Light Soy Sauce, Oyster Sauce, and Chinkiang Vinegar. These notes explain what each linked ingredient is doing before you start swapping or shopping.
Light Soy Sauce
The everyday salty soy sauce used for seasoning, not the same as dark soy sauce.
Tamari can work when a recipe needs a gluten-free-adaptable path, but labels must be checked.
Oyster Sauce
A glossy savory sauce that brings sweetness, salt, and body to Cantonese greens and noodle stir-fries.
Use mushroom stir-fry sauce for vegetarian cooking, or soy sauce plus a little sugar in a pinch.
Chinkiang Vinegar
A dark rice vinegar with malt-like depth, used in dressings, dipping sauces, and sweet-sour balances.
Rice vinegar is lighter. Add a small amount of soy sauce to approximate the darker savory note.
Rice Vinegar
A lighter vinegar that brightens salads, soups, and quick sauces without the depth of black vinegar.
Use Chinkiang vinegar for a darker, richer finish.
Method
Cook to the cues
The method starts with build the soy bath and ends with rest before cutting. Use the checklist to keep your place, but let the visible cues decide when to move on: soy liquid trembles instead of boiling hard, skin turns evenly mahogany and glossy, and sugar dissolves before chicken enters.
Cook along
Check off steps as you cook
Build the soy bath
Combine soy sauces, Shaoxing wine, sugar, ginger, scallion, star anise, cinnamon if using, and water. Simmer until the sugar dissolves and the liquid smells aromatic.
Lower in the chicken gently
Add chicken breast-side down or add chicken legs skin-side up. Keep the liquid at a quiet simmer rather than a rolling boil.
Turn and baste
Turn the chicken several times and spoon hot soy liquid over exposed skin. This builds even color without needing to fully submerge the bird.
Check doneness carefully
Cook until the thickest part is safely done and juices run clear. For a whole chicken, check the thigh joint and rest before chopping.
Rest before cutting
Lift out the chicken, brush with a little sesame oil if desired, and rest before cutting through the bone or slicing. Strain and save some sauce for serving.
Substitutions and safety
Before you improvise
Use the substitutions as controlled changes rather than random swaps. Keep the same cooking method, keep the sauce balance close, and use the safety notes when changing protein, reheating leftovers, or holding the dish for later.
Substitutions
- Use bone-in legs if a whole chicken feels impractical; they are easier to turn and cook evenly.
- Use brown sugar if rock sugar is unavailable, but keep the sweetness restrained.
- Use a splash of dry sherry only if Shaoxing wine is unavailable and you are comfortable with the flavor change.
- Add dried tangerine peel for a Hong Kong barbecue-shop aroma, but keep it optional.
Safety notes
- Cook chicken to a safe internal temperature, checking the thickest part away from bone.
- Do not reuse soy braising liquid unless it has been boiled and stored safely.
- Cool leftovers quickly and refrigerate within 2 hours.
Serving and storage
Finish the meal well
Serve Soy Sauce Chicken while chicken rests before chopping so juices do not flood the board. If you are cooking ahead, cool leftovers quickly, keep the sauce or cooking liquid with the main ingredients, and reheat gently so the texture stays close to the first serving.
FAQ
Common questions
Is soy sauce chicken roasted?
No. Cantonese soy sauce chicken is usually poached or gently braised in a soy-based aromatic liquid. The glossy skin comes from the liquid, sugar, and basting, not oven roasting.
Can I use chicken pieces instead of a whole chicken?
Yes. Bone-in legs or thighs are a practical home option and are easier to keep evenly submerged or basted.
Why is my soy sauce chicken skin torn?
The liquid boiled too hard, the chicken was moved roughly, or it was chopped before resting. Keep the simmer gentle and use tongs carefully.
Can I make soy sauce chicken ahead?
Yes. It reheats well and can also be served warm or room temperature after safe storage. Keep some strained sauce for serving.